Large Format (Poster) Printing Quick Guide
The College of Science & Engineering
maintains an HP DesignJet
Z6800PS large scale poster plotter that is available for academic-related use. It is physically capable of up to 42" wide paper at
up to 100 feet in length. It has 24", 36", and 42" roll paper available in different types, so
plan your posters to fit onto one of these sizes or you will have to provide your own paper. Below are links to
templates, useful CMU wordmarks, tips for
designing posters, and answers to questions about how to format and print your
posters.
PRINTING DIRECTIONS
Follow these simple steps for the best results.
- To print, send me the file in one of four ways. You can bring it to my office (220 Brooks Hall) on a USB key, e-mail it, have your faculty advisor put it on the K: drive, or send it to me via the CST filesender server at http://filesender.cst.cmich.edu for files too big to e-mail.
- I need to know if it was created (and majority of the edits done) on a Macintosh or Windows computer.
- I need to know what type of paper you want it printed on.
- Bright White – You can write on it, but not the best choice for conferences. Good for drafts.
- Standard Glossy – This needs to dry for 24 hours after printing before rolling. Best choice to look good and last.
- Instant-Dry Glossy – Roll it up and go! Downside is it starts fading in a few months. Good for procrastinators and short-term displays.
- You can pick-up your poster in the cubicle at the back of Brooks Hall 221 during normal Biology Department office hours from 8am-5pm. Your name will be on it so you can easily identify it from the other posters waiting for pickup.
- Posters take approximately 45 minutes to an hour to print, assuming no other posters are ahead of yours.
FREQUENTLY ASKED QUESTIONS
QUESTION:
Who do I contact for help? You should contact me, Robert Devantier
(220 Brooks Hall, 774-2293,
robert.h.devantier@cmich.edu), with any questions or problems. I will
not create your poster for you, but I will assist in making sure that it prints
correctly.
 QUESTION: How
should I format my poster?
The preferred application for creating posters is Microsoft PowerPoint.
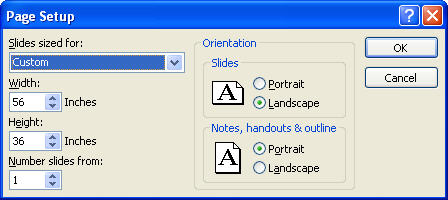
PowerPoint has a page size limit of 56". So, the largest poster you will be able
to print on our plotter using the supplied paper in PowerPoint will be 42" x
56". To create a 36"x56" document in PowerPoint, open a blank PowerPoint file
and go to File, Page Setup and set the width to 56" and the Height to 36" and
Orientation for Slides to Landscape.
QUESTION: How
should I format my poster?
The preferred application for creating posters is Microsoft PowerPoint.
PowerPoint has a page size limit of 56". So, the largest poster you will be able
to print on our plotter using the supplied paper in PowerPoint will be 42" x
56". To create a 36"x56" document in PowerPoint, open a blank PowerPoint file
and go to File, Page Setup and set the width to 56" and the Height to 36" and
Orientation for Slides to Landscape.
If you need to create a poster that
is larger than 56" wide, it is recommended that you use a different application
called Adobe Illustrator. Adobe Illustrator is capable of using a page size up
to 225", or 18.75 feet. Adobe PDF documents are easily printed. Support will not be offered to those who use any other
applications (such as Microsoft Publisher) since printing tests have not been
successful.
Templates have been created with the common sizes of posters. These
are a good place to start.
QUESTION: What
margins should I be using?
PowerPoint does best if you keep a 1" margin on all four sides of your
poster. This means no graphics or text boxes should be in that margin area. A
handy thing to do is to create a box object that can be used as your "margin".
Once your poster is ready to print, just delete the box. The templates have this
box created for you. Your poster may fail to print correctly if you do not
maintain the margin. A margin of 1/2" has proven fairly safe if you really need the extra space, and the absolute minimum would be a 1/4" margin on all four sides but is very risky in PowerPoint.
QUESTION:
Where do I print my poster? Printing is done by Robert Devantier. Once printed, the posters will be located in the cubicle at the back of the Biology Department
workroom, 221 Brooks Hall. The room is available only during normal
department hours (usually 8am to 5pm, Monday thru Friday). A single poster will take approximately 45 minutes to print. Please plan enough time for printing (HINT: don't wait
until the last minute).
QUESTION:
Where can I get University Seals or CMU Logos?
CMU Wordmarks are
available to insert into your poster document from the
CMU Media Channel. Please make sure you
follow the usage guidelines. The TIF graphics that are available will work the
best in PowerPoint. Using an image from anywhere else will result in poor print
quality, especially if the image is enlarged in size. This is due to most
graphics being sized for optimal web viewing speed, and do not contain enough
resolution to support enlargement without pixelation.
QUESTION:
When I view the whole poster on the monitor
everything is too small. Both PowerPoint and Illustrator have Zoom
In/Out capabilities. You can zoom in on the area that you are editing so that
you can see what you are typing. Change to zoom to "Fit" when you want to see
the entire poster on the screen.
QUESTION: How am
I suppose to edit my poster?
While you can copy and paste text from
other applications (like Microsoft Word) it is better to just type the text
right into a text box. If you must copy and paste from Word into PowerPoint, do
so into a text box rather than just pasting. Pasting text objects in brings all
of its style properties (such as font size, type, color, etc) and sometimes
causes irregular style effects on the text when printed. A smart decision is to
just manually type in all your text directly into Illustrator or PowerPoint.
QUESTION:
What should I bring to print my poster? Have your poster on your campus Udrive, or bring your poster on a USB
Memory Key or have it burned onto a CD. You should also bring a poster tube to put your poster into. Alternative options
would be two or three 3" x 1/8" rubber bands or paper clips. The paper will
crinkle and show crease lines, so do not plan on just folding it into your
backpack.
QUESTION:
What if the poster does not look right while it is printing? On the
front right side of the plotter is a control panel. On that panel is a button
marked "Cancel". Press this ONCE to cancel your print and then seek assistance
in correcting the problem.
QUESTION:
How much does it cost to print a poster? Right now there is no charge
system in place. Just know that other universities charge $4 or more per linear
foot to print ($20 for a 56" poster). They also charge for any rough drafts and
mistakes. I have heard that getting one done at places like Kinko's can be
$85-$150. Please be responsible and try not to waste resources.